Whether you’re selling as a side-hustle, or seeking to build brand presence on an additional marketplace, eBay can be worth your time.
eBay has come a long way since its beginnings in the 90s, seeing 132 million yearly active buyers worldwide and handling $73 billion in transactions in 2023 alone.
You can be sure that eBay’s listing format for sellers is optimized to make your listings effective. But sometimes you want just a little more flexibility. Sometimes you might want to add images not only to the listing photos, but to the listing’s description itself.
Here’s how you do that.
Why Put Images In An eBay Description?
Let’s begin with an example:
I’m flipping some clothing on eBay, and I want to provide as much information as possible about what I’m selling.
Adding photos or pictures to my eBay listing description is a great way to display useful, relevant information about what I’m selling. It also helps avoid questions about the item, or confusion on the part of potential buyers.
An item of clothing has specific measurements, and I’m going to include them my listing description. But to make these measurements even more clear, I want to include an image showing how and where those measurements were taken, e.g. how exactly a sleeve was measured.
Here’s an example of what I’m talking about:
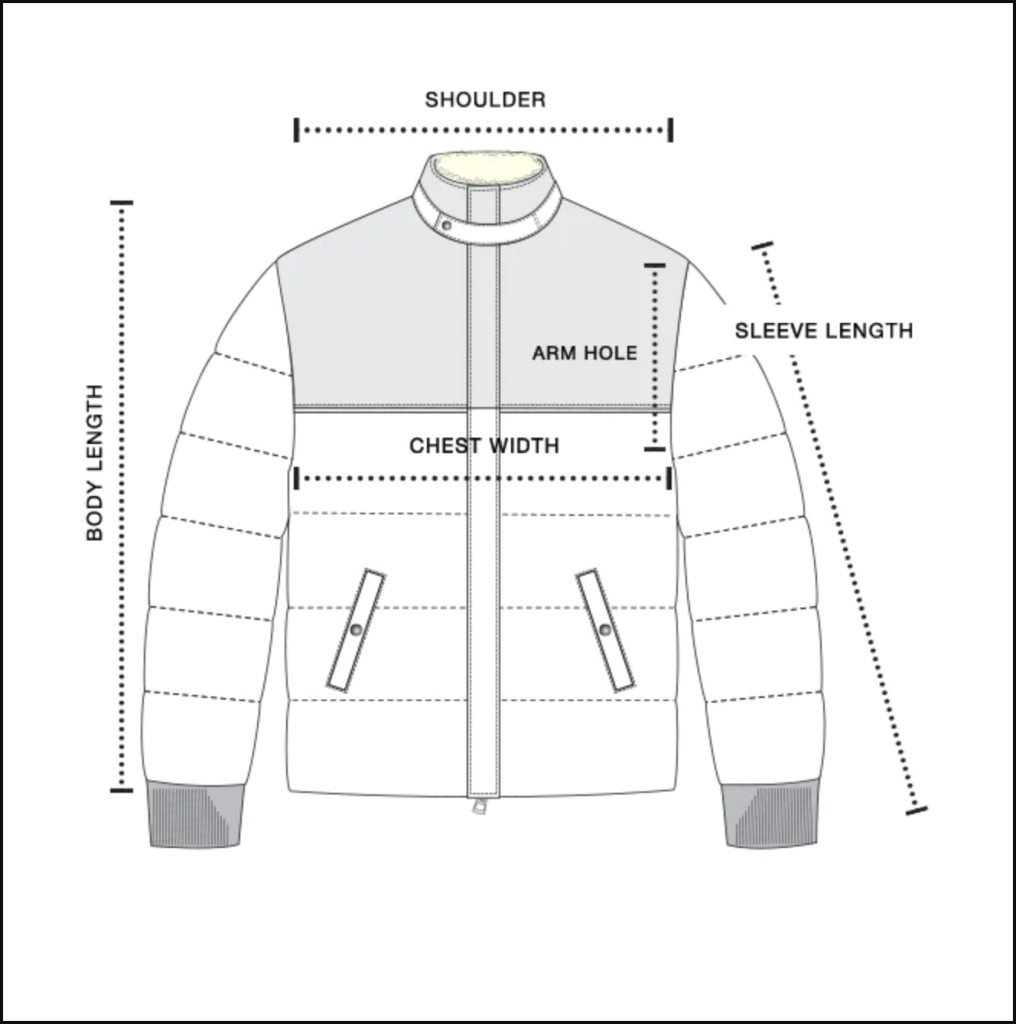
I could just put this image among my product images and leave it at that, but it can be helpful to include within the description section, right below where I’m including the specific measurements of the item I’m selling. At least, it’s something to test – and if you’re serious about selling on eBay effectively, you’ll probably want to test different strategies.
Side note: for many items, people will include images of a tape measure held against the item among their product photos, demonstrating the measurements. I think this is a fine method. How you want to present what you’re selling is up to you!
eBay doesn’t have a feature to upload images directly into the item description section, but we can work around this quite easily.
How To Embed Images Within Your eBay Listing Description
To embed an image within our eBay description, we’re going to follow five simple steps:
- Upload the image to our listing’s product photos (as we would with any other item photo).
- List the item, i.e. make the listing active on eBay.
- Copy the Image Address from the live listing page
- Embed the image within the description with a simple line of HTML.
- Update the listing to display our new description.
You might notice that Step 2 entails listing the item before we’ve embedded the image in our description. This isn’t ideal, but it’s a necessary step to make this method work – we’re being creative here. I’ll elaborate on this in Step 1.
Let’s get started.
Step 1: Upload The Image To The Listing Photos
To embed an image in our listing’s description section, the image needs to needs to be hosted somewhere, accessible by URL.
We could use an image hosting service like Imgur, and use the URL/link that points to it there, but Imgur prevents images hosted on its site from being displayed on eBay.*
*If you try to embed an image uploaded to Imgur and it seems to work, that’s because it can be visible to the seller (you) for a short period of time while the photo is still cached in your browser. After a few hours, or maybe a day, it will no longer be visible.
Fortunately, we can just upload the image we want to embed to our listing’s photos as we would any other, effectively using eBay’s own severs as an image host. This will give the image a URL, which we’ll use in Step 4.
If you’re following along with this guide, go ahead and upload the image you want in your description as you would any other photo of your item.
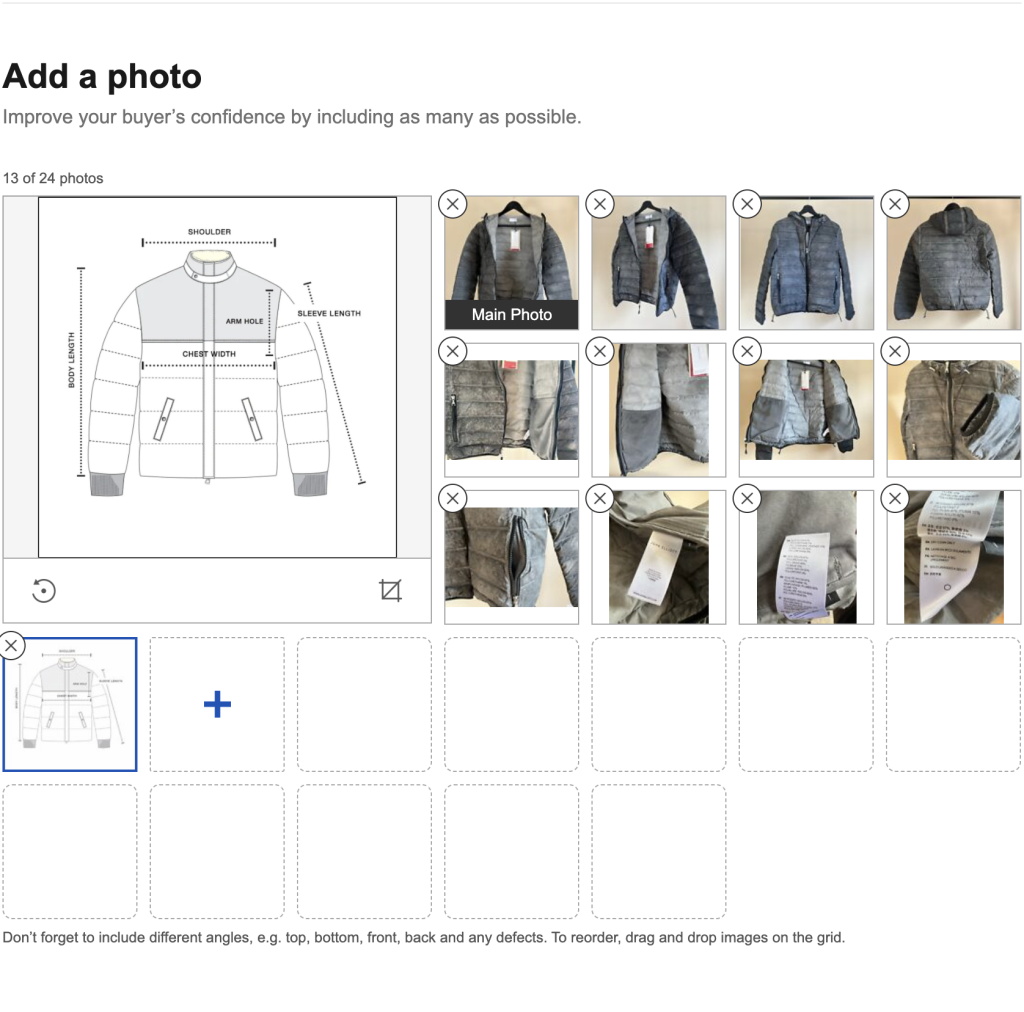
As you can see in the image above, I uploaded the image I want in my description to my photos.
Step 2: List Your Item
After uploading all of your photos via eBay’s listing tool, simply click “List It” and make your item listing go live.
Now, onto the next step.
Step 3: Copy The Image Address From Your Live Listing
Now that our listing is live, eBay has allocated URLs to our photos. We’re going to get the URL for the photo we want in our description so that we can then insert it with some HTML (I’ll explain this below, don’t worry).
To copy the Image Address of the photo you want in your listing description, first navigate to the page for your listing. Click on the photo you want in your description, and then copy its address with [right-click; copy-image].

Copying the image address will save it to your computer’s clipboard, but you might want to paste it into a note for safe-keeping.
After you’ve copied the Image Address, click on the option to “revise listing” (it should be at the top of your listing’s page). This will allow us to edit the now live listing, and allow us to (finally) add an image to our description.
Step 4: Embed The Image In The Description With HTML
To embed our image within the listing description, we’re going to use a simple line of HTML.
A Super Quick HTML Primer
HTML, if you’re not familiar, is code that describes the structure of a webpage, and it tells a browser how to display content, where things headings and paragraphs and images go.
HTML uses *elements* to describe, well, these basic elements of a webpage and its content. Elements always consist of a start tag, some content, and an end tag, like this:
<h1> These are heading tags with some content in between them! </h1>. HTML also uses attributes, which allow us to provide information about elements.
To embed our image, we’re going to use an img element. Inside of this img element, we’re going to include an src attribute. This attribute will let us point to our image’s location using the Image Address we conveniently copied in the step above. You’ll see how this looks below.
Note: If you don’t understand HTML, it’s okay! All you need to do is copy and paste.
Step 4A: Display HTML Editor
Now, on your listing’s revision page, scroll down to the Description section, and click the check box which reads, “Show HTML Code.” This allows us to edit the HTML of our description.
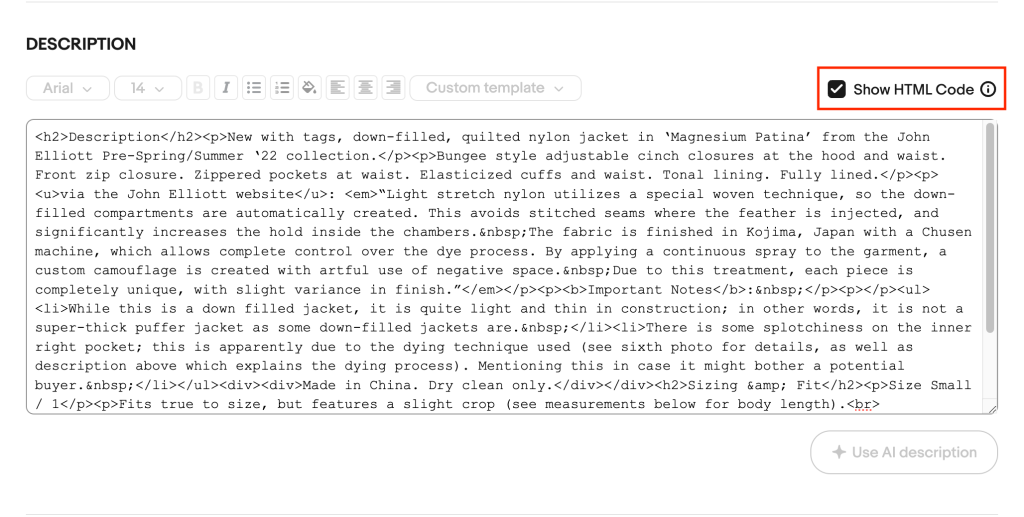
Upon clicking “Show HTML Code,” you’ll be met with a somewhat messy-looking wall of HTML. Within this, you’ll notice some of those HTML elements I was talking about above.
Here’s where we’re going to paste our line of HTML, which will be as follows (replace what’s between the quotation marks with your own Image Address, which you copied in the step above):
<img src=”https://i.ebayimg.com/images/g/YourImage/s-l1600.jpg”> Step 4B: Place (And Paste) Your HTML Code
To determine where to put your line of HTML, read through the text to locate the spot where you want your image to show up.
Here you can see where I placed my image; it comes right after the section in which I typed out my item’s measurements:
Tip: If you’re having trouble locating where you are in the HTML view of your description, you can switch back to the normal view and add some abitrary text where you want to place your image, e.g. PUT IMAGE HERE. This will show up in the HTML view, and you can replace it with your line of HTML.
After you’ve added your HTML, un-check “Show HTML Code” and switch back to the default description view. You should now see your image in your description.
Step 4C: Resize Your Image In The Description (Optional)
As you can see in my example, the image that appears in the description after adding the HTML might be a bit large. It’s possible to change the sizing.
Option 1: Add A Width Attribute
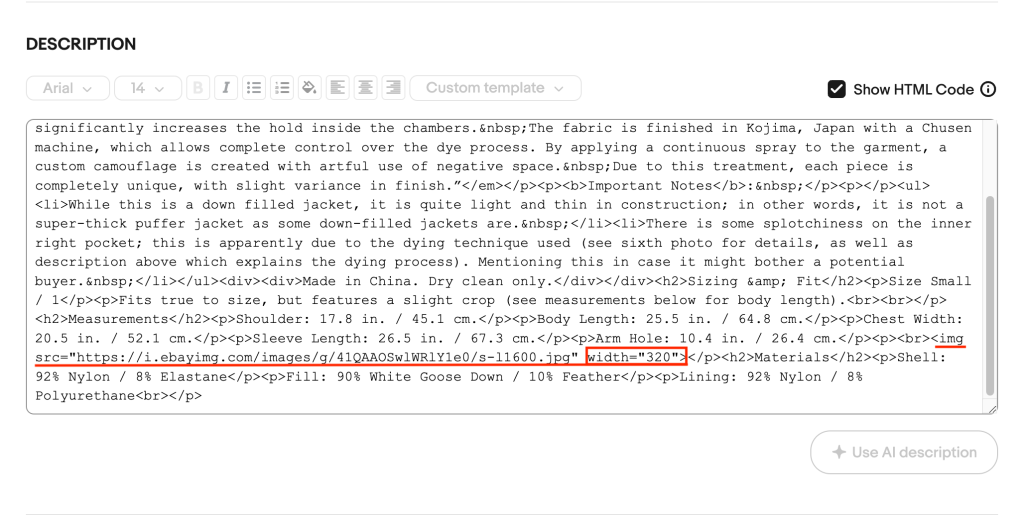
I chose to “force” a width of 320px for my image. This way, it will work well on both desktop and mobile.
This is done by adding a width attribute to our HTML image tag, like so:
Option 2: Change The Suffix Value In Your Link
Another way to change the size of the image is to manipulate the value at the end of your Image Address. eBay creates image links such that the size is determined by numbers at the end of the URL. In my example, there are the letters “/s-l” followed by an image size:
https://i.ebayimg.com/images/g/41QAAOSwlWRlY1e0/s-l1600.jpgIn my link, the image size is 1600. The “s-l” part of the link likely stand s for “side-longest”, so if you want an image that is 500 pixels on the longest side, change the number to 500, and so on.
Photos that use this “/s-l” suffix will support sizes: 96,200,300,400,500,600,800, and up. You probably shouldn’t use anything above 600 or 800.
Option 3: Change The Suffix Code (If Applicable)
In a eBay forum answer, someone has said that eBay also uses photos with a different suffix, which looks something like “_0.jpg”. Here the numbers are codes for images sizes, taken from that post:
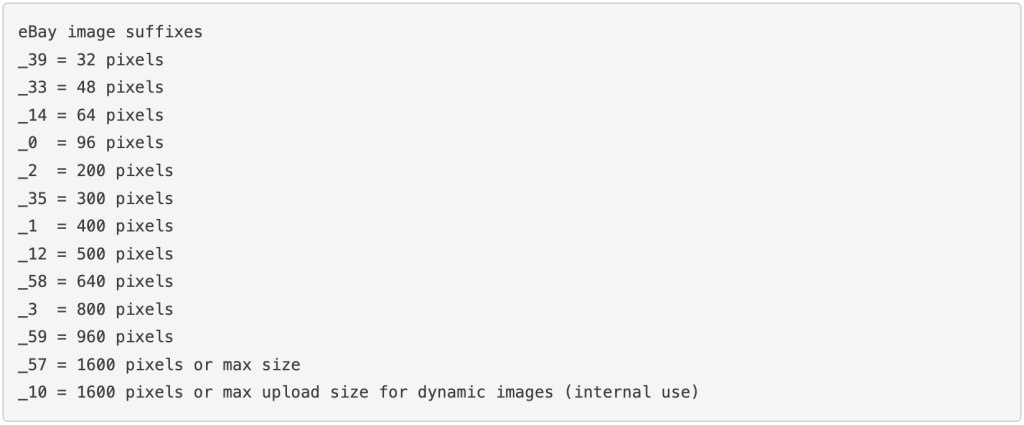
In the case of these codes, eBay will not enlarge the photo if you pick a size larger than the original upload size.
Step 5 – Revise Your Listing!
Once you’ve done all of the above, update your listing to publish the changes by clicking “Revise It.”
You should now have an image in your eBay listing description!
Here’s how mine looks:
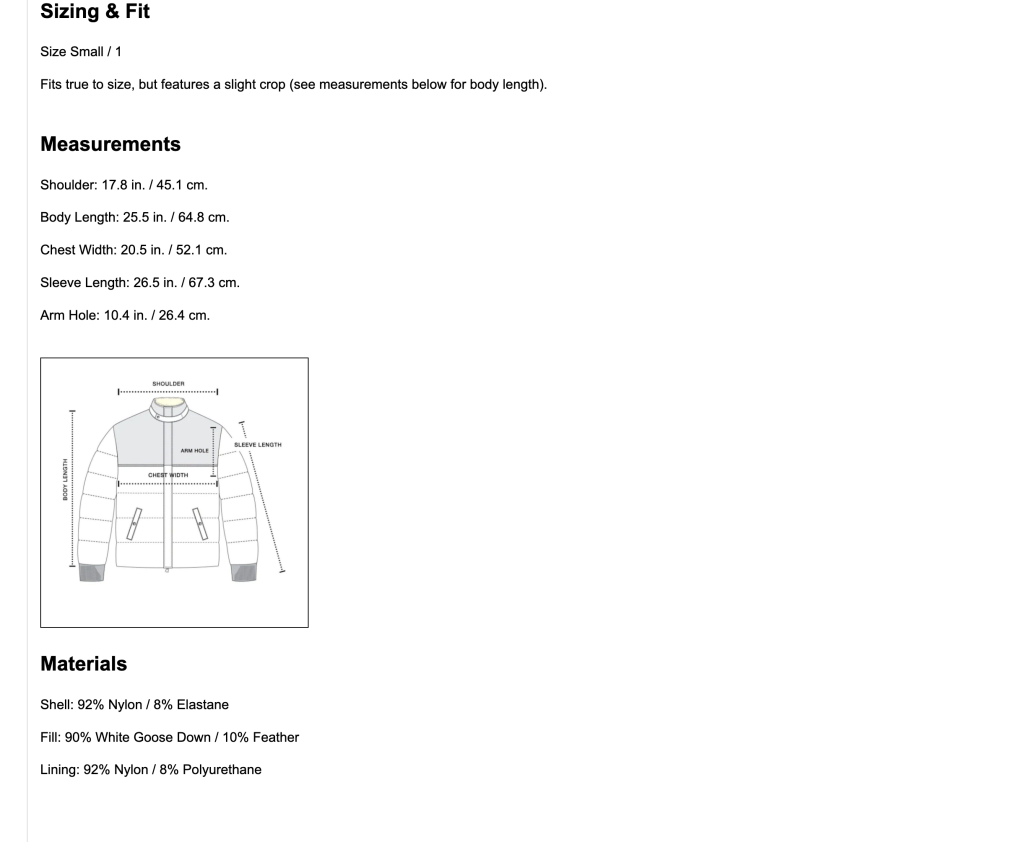
Success!
A Quick Recap (TL;DR)
To embed an image in your eBay listing’s description section:
- Upload the image along with your other product photos.
- List your item.
- Copy the Image Location from the photo on your live listing page.
- Embed the image in your description using a line of HTML –
<img src="paste your image location here">– replacing what’s between the quotation marks with the image location URL you copied. - Edit the image size as necessary.
- Revise your listing to show the update.

Leave a Reply